How To Prepare Your Songs For Mixing [The Ultimate Guide]
![How To Prepare Your Songs For Mixing [The Ultimate Guide]](/blog/s/img/wp-content/uploads/2018/03/How-To-Prepare-Your-Songs-For-Online-Mixing-Uncompressed-1100x640.jpg)
How to Prepare Your Songs for Mixing.
I’ve recorded my album and want a professional to mix it. What do I do?
More people than ever before are recording their music by themselves. Many quickly find that they don’t have the time or expertise to mix their music. But don’t worry, there are many local and online mixing engineers that will be more than happy to help mix your music. The trick now is to break down your songs into separate tracks for the mixing engineer to mix. This guide will tell you, step by step, the best practices for preparing your songs for mixing. This applies to both online mixing and in-person mixing. Follow this guide closely, and your mixing engineer will be able to do his/her best work.
REMOVE ANY UNUSED AUDIO FROM EACH TRACK.
If you have 2 minutes of hum on the lead vocal track before the vocalist starts singing, then edit out the hum. As a mixer, we don’t know if this was intentional or not. If the hum or buzz was left in and wasn’t added for effect, it can quickly become a distraction. These small details add up across all the submitted tracks and will take away from the clarity of the song. Zoom into each track to search for noise and remove it. Keep it clean and tidy – your mixing engineer will be very thankful, and the final mix will sound much better.
FINALIZE YOUR EDITS, VOCAL TUNING, ETC.
Don’t expect the mixing engineer to fix out of tune vocals or an off-time drummer (unless this was agreed upon). After you are finished editing, make absolutely sure that all edits are properly crossfaded. If you don’t, every edit will have an audible pop or click that is extremely distracting for a mixer (and the mixer will contact you to fix the edits). Check your digital audio workstation’s manual to see if you can set up automatic crossfades – it’s a huge time saver! The crossfade should be really short to make it as unnoticeable as possible (1-5 ms).
ONLY KEEP IMPORTANT EFFECTS AND AUTOMATION MOVES.
Keep any effects that may be difficult to recreate or have a very specific sound (reverb, filters, ambiance, distortion) or automation (volume or panning automation). There is no point making your mixer or producer reinvent the wheel – you already made the right sound, so send it that way. If you aren’t attached to a particular sound, then remove the effects and keep it dry. If you think the mixing engineer or producer can make something better, send two versions – one with the effects and one without. Just be sure to label the files appropriately by putting a “w” or “wet” in front of the exported file. Files without any effect do not need any special labeling.
DISABLE ALL EQ, PLUGINS, AND NON-ESSENTIAL EFFECTS!
In general, it’s best to keep every track dry. Disable all effects on every channel unless you want a very specific effect that may be hard to recreate. Once all the tracks have the plugins and effects removed/bypassed, set all faders to unity (0) gain. This will ensure the volume of the track is workable and won’t clip. Do not export any tracks with their fader above 0 db! This will likely clip the audio and cause distortion. Following these rules will provide the mixing engineer with the greatest freedom to mixing the song.
With all plugins disabled and EQ removed, all faders set to unity or 0 dB won’t clip when exported.
PLACE ONLY ONE ELEMENT ON EACH TRACK.
For no reason should you have both background vocals and main vocals on the same track. This is extremely confusing as a mixer as your background vocal will become as loud as the main vocal. The same applies for instruments. Never, ever have two different instruments on the same track. I’ve personally seen this where a snare, hand claps, and a cymbal swell were all on the same track. I guarantee this will result in a worse sounding mix. If you have multiple takes of the same instrument or vocals across multiple tracks, consolidate these into a single track. This will reduce the total number of tracks and make your song much easier to mix.
These principles also apply to virtual instruments! Consolidate multiple takes into a single midi file for each instrument. Include both the printed version of the virtual instruments and the midi file. This gives the mixer an option to use the current sounds or make new ones from the midi.
ALL TRACKS SHOULD BE CONSOLIDATED AT 0 AND CONTINUE UNTIL THE END OF THE SONG.
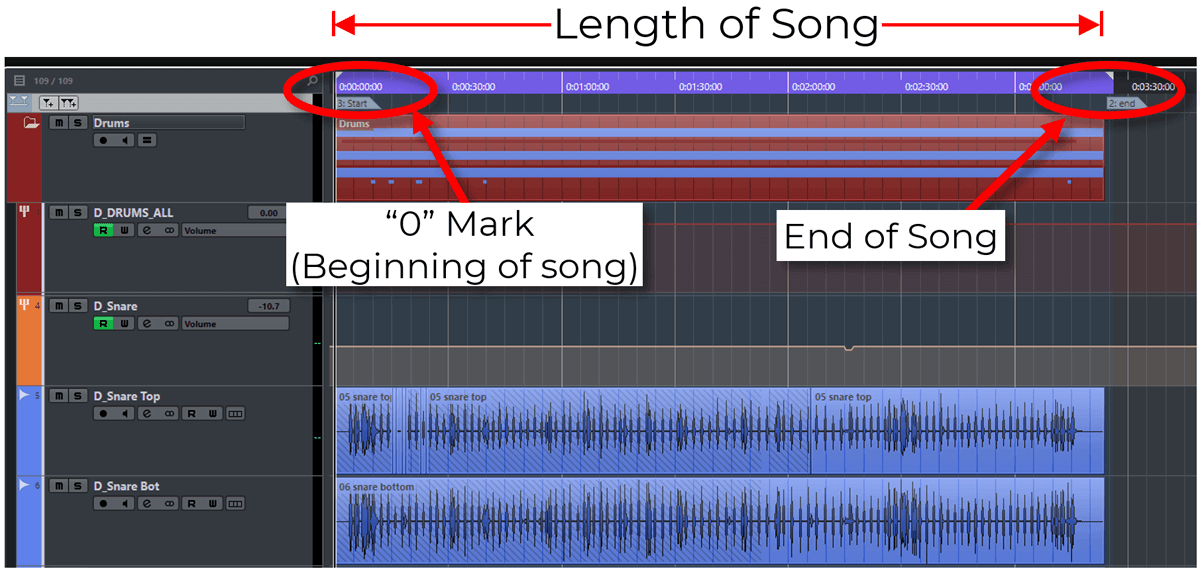
What this means is that all tracks, regardless of having audio or not, should all start at the beginning and continue until the end of the song. This is very important because it provides a starting point to align all the tracks in the song, guaranteeing that the song will be arranged correctly for the mixing engineer.
All tracks must be consolidate at the start (“0-Mark”) of the song and continue until the end of the song – regardless of the length of the track. This ensures the tracks will line up for your mixer.
Export all tracks in the same quality as they were recorded.
Export the files in an uncompressed (or lossless) audio file format. Wav files are by far the most common file format for sending to a mix engineer. Make sure export the files from the session in the same audio quality as they were recorded. There is no benefit to upconverting a guitar that was recorded at 16-Bit 44.1kHz to a 32-Bit 96kHz wav file. This will only make the file size larger and not improve the quality of the recording. The majority of the time, 24-Bit 44.1 kHz wav files work well for mixing and mastering.
How to Label Your Tracks.
If there is one thing you should do for every session, it would be to properly and concisely label your tracks! Do NOT assume the mixer will know what “Audio_04.dup” means. The best mixing decisions only happen when the mixing engineer can immediately react to their gut instinct. If they are trying to figure out what each track is and labeling it, precious time is wasted and the mixer loses that extremely important initial reaction to the song.
Label tracks with simple, understandable abbreviations.
Use the same abbreviation before all tracks of the same element. This groups the audio tracks together alphabetically. Lastly, if the track is supposed to be panned, add a letter to the end to make that clear. For example, if you have 3 guitars in a song with one panned left, one right, and one center, try labeling your files like:
GTR_L
GTR_R
GTR_C
Since files are typically sorted alphabetically, this will put all the guitars files next to each other. Same applies for drums:
D_Snare
D_Kick
D_OH_L
D_OH_R
This may seem a bit nitpicky, but when you have 300 songs to mix every year, these small details really add up. It’s always best to be on your mixing engineer’s good side.
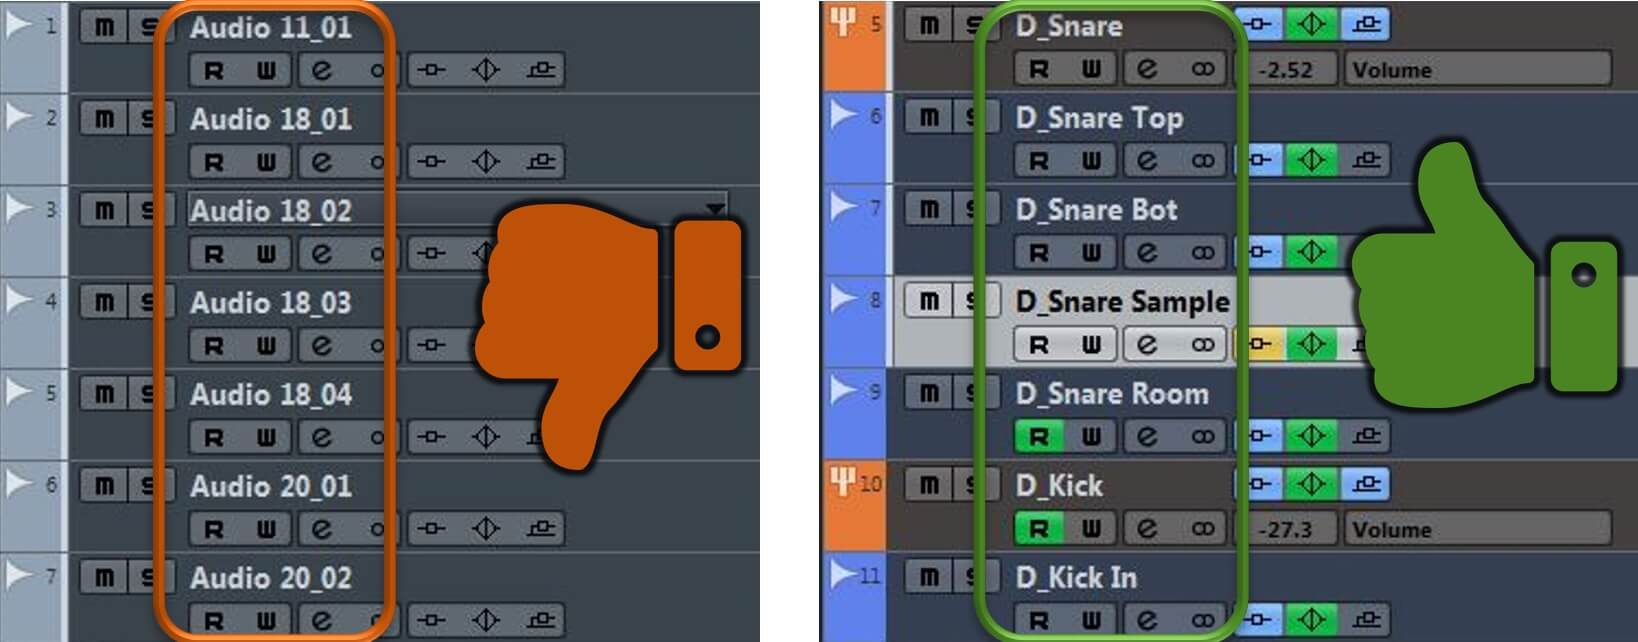
The image on the left shows what happens when you import unlabeled files into a new session for mixing. The mixing engineer must go through and listen to each track and label it properly, which wastes time (that you paid for!) and prevents the mixer from being creative. The image on the right shows how properly labeled tracks group together and make it easy for the mixer to identify each track and get to work!
INCLUDE A REFERENCE MIX OF YOUR SONG (A DEMO IS FINE).
This is incredibly useful. It allows the mixer to step inside your head and understand what your vision is for the album. Don’t be worried if you think it doesn’t sound great – that’s not the point. These references provide an immediate guide to your desired instrumental balance. Without this reference, many unnecessary rounds of revisions can occur just to get the balance right. It’s also a good idea to provide another reference song from another artist that you want your song to sound like. You can include a YouTube link or include the song in the reference folder. Save the revisions for what’s really important like vibe and overall sound.
CHECK THAT YOU DIDN’T EXPORT MUTED OR UNNECESSARY TAKES.
Receiving a session with multiple tracks of silence is very confusing to a mixing engineer. If you have multiple takes, pick only the best sounding ones. If the mixer or producer requests multiple takes, then include the takes, but label them best to worst. The goal is to minimize the amount of decision making the mixer has to do so they can stay creative. Having too many options can be very distracting! Mixers can quickly we lose creativity and vision by having to make these additional decisions.
Organization and transferring the files
Once the tracks are exported, it is a good idea to put them into a folder with the name of the song. Repeat this for all the songs. If you have reference mixes and notes (which you should), put them their respective folder and make it clear what files are references for which songs.
Organizing your consolidated audio files into folders as shown above makes importing your audio files for mixing a breeze! Once all files have been placed into their folders as shown above, .zip the folder and send your project as a single file.
Finally, zip all the folders into a single file and send your music!
There are free services available to transfer your audio files to your mixing engineer. Websites such as wetransfer.com, pcloud.com, etc. allow you to send files without making an account. You can also host the files using google drive or dropbox. Just be sure to send a link to your mixer. If all else fails, you can always buy a $5 USB drive and mail it to the mixing engineer (this has happened to me before).
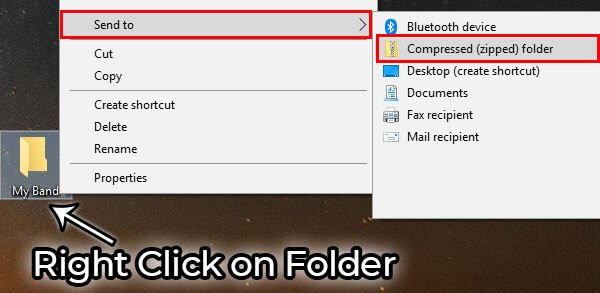
To make a .zip file for your consolidated file folder, just right click on the folder, to go “send to” and then “compressed (zipped) folder”.
To Summarize:
- Remove any unused audio from each track (guitar hum, floor creeks, headphone bleed, etc.)
- Finalize your edits, vocal tuning, quantization – check all crossfades for pops/clicks!
- Place only 1 element on each track. Exceptions include (but aren’t limited to) group background vocal tracks or stereo drum overheads.
- Verify no unnecessary takes or muted tracks were exported.
- All tracks should be consolidated at 0 and continue for the length of the song.
- “0 out” all the faders (except for tracks with special volume automation).
- Include a reference mix of your song and also song(s) that you want your song to sound like (a YouTube link is fine).
- Label all tracks with simple, easily understandable abbreviations.
- Disable or remove all plugins/EQ/mastering from all tracks (unless it’s a very specific sound that you want to keep).
- Organize all consolidated audio files into folders by song name as shown in the figure above.
- Export in uncompressed wav files the same quality that was recorded (44.1kHz, 24-Bit wav files work great 99% of the time). Avoid lossy formats like .mp3 .m4a .aac.
- Include notes and track information in a text file or pdf for meta-data encoding.
We hope this comprehensive guide will make it very clear how to export your songs for mixing. Stay tuned for part 2 where we give you the best way to prepare your songs for mastering!
How have you been preparing your songs for mixing? Let us know in the comments below!


![[RP Blog] Set All Faders To Unity Before Exporting [RP Blog] Faders Not At Unity and At Unity](/blog/s/img/wp-content/uploads/2018/03/Faders-At-Unity.png)


![[RP Blog] Folder Organization For Online Music Mixing Submission [RP Blog] How To Organize Audio Files For Online Song Mixing](/blog/s/img/wp-content/uploads/2018/03/Sorting-Songs.png)


