
ULTIMATE Guide to MIXING CLEAN VOCALS for METAL and ROCK [Like Periphery, Tesseract]
![ULTIMATE Guide to MIXING CLEAN VOCALS for METAL and ROCK [Like Periphery, Tesseract]](/blog/s/img/wp-content/uploads/2020/07/18-Ultimate-guide-to-clean-vocal-mixing-rock-metal8b-1280x640.png)
Mixing clean vocals for heavy genres like metal can often be an afterthought.
We spend so much time making a wall of guitars and mixing punishing drums, but what ends up happening is there is NO SPACE left for the vocals – ESPECIALLY HUGE CLEAN SOARING VOCALS in some styles of metal and prog rock (think Tesseract, Periphery, Contortionist, etc.)
I personally struggled with this for a long time.
After years of reading pretty much all the “mixing clean vocals” tutorials for metal, I pretty much gave up. It didn’t matter what I did to make the vocals sit right.
It took a LONG time, but the answer was right in front of me the entire time. Turns out these mixing clean vocal tips also work for EDM, Rap, Pop, or other dense/loud music.
Below, I’ve condensed all these years of trial and error into this extremely detailed, step-by-step walk through on how to mix crystal clear vocals in dense mixes.
Get ready because there are lots of knowledge bombs about to be dropped.
Pro Tip: Scroll to the bottom to watch the video at the end of the article where Bobby walks you through each step of the process!
How To Mix Clean Vocals for Metal and Rock
Compressor Settings for Mixing Singing Vocals
Aggressive and dense songs often need a more aggressive vocal compressor.
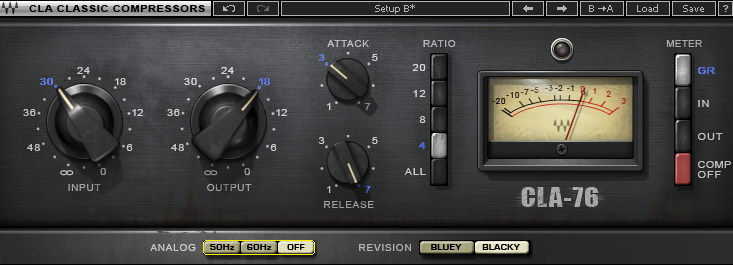
My favorite for this is the .
Set your release as fast as possible (7 on the plugin) and slow down your attack to add aggression. A slower attack (larger attack times) allow the initial transients to go through the compressor, which sounds more “in your face.”
A good starting point would be attack at “3” and release at “7” on this plugin. On other plugins, aim for around 30-50 ms attack and the shortest time possible for release.
To add aggression to clean vocals, experiment with slower attack and faster release settings like shown above for the Waves CLA-76 plugin.
EQing Vocals
To give the vocals “air”, start by removing some muddy frequencies near 300-600 Hz. Start by boosting the EQ and listen for the spot where the vocals sound the worst or are hard to understand. Those are the frequencies you want to remove.
Make your cut there. Try not to over do it! These frequencies give the vocals some weight, so we need some to sound powerful. Watch here!
Adding Weight and Thickness to Clean Vocals
For this trick, we will be setting up a parallel compression bus (or you can use any compressor plugin that has a “dry/wet knob.” That basically is the same thing.
My favorites are:
You want to send the clean vocal to this bus (or if you have the plugin on your clean vocal channel, adjust the amount of compression using the dry/wet knob – should be below 50% and closer to 10%).
Aggressively compress the vocal to bring out the breaths and airy details of the vocal. Then adjust the volume of this aux send to taste. Often, it will be much lower in volume compared to the main vocals (of if you have a dry/wet knob, adjust this to dial in the effect).
Come learn more mixing and mastering secrets with me live in the studio on twitch!
📅 Thursdays at 8 PM EST
🔗 twitch.tv/raytow…
Vocal Effects (Stereo Widener, Delay, Reverb)
Subtle Stereo Widening Vocal Trick
To make the track larger than life, I like to widen my vocals using a stereo widener. But be careful! A little vocal widening can go a long way.
When I mix clean vocals, my favorite plugin is .
I set up this plugin as an FX bus/aux send so I can use it for multiple vocal tracks. When set up this way, my favorite plugin settings can be found in the image below. If you don’t want to make an FX send, you can add the plugin to your main vocal channel or bus and dial the wet/dry knob back.
To dial in the right amount of vocal widening, increase the send or wet amount until the effect is obvious. Then dial it back until you just can’t hear the effect anymore… then dial it back just a touch more. DONE!
Use a spacial enhancer to widen vocals like SoundToys Microshift plugin.
Vocal Delays
Mixing clean vocals completely dry will sound strange in the final mix. This is because we normally don’t hear vocals that way in our daily lives. We need to give the vocals a sense of space and that can be achieved with delay.
When to Use a Delay Instead of Reverb?
Delays are useful when you want to make the vocals sound bigger and more lush, but don’t want to push them back in the mix.
Reverbs have a tenancy to make us think the vocals are farther back in the mix. So if your vocals feel too far away, you might want to reduce your reverb (or get rid of it) and use a delay instead.
I typically use 3 different types of delays on my vocals. A slower, tempo synced delay to add length to the vocals, a faster ping pong delay to add width, and a tempo mismatched (1/4 note one side and 1/16 on other) to “fill in the gaps”.
I highly recommend rolling off low end from your delays to prevent buildup of frequencies in the low mids. So try putting a high pass filter around 400 hz and adjust to taste.
If you need your delays to hide more when mixing clean vocals, use a low pass filter to dial back the high frequencies. Try a low pass filter around 3 KHz and again, adjust to taste.
How to Add Reverb to Vocals
Reverb give the vocals a sense of space. Depending on what you are trying to achieve, you may not need to add any reverb at all (very dry, clear vocal sound). Instead, just using a delay might be a better option.
If you to gel your vocals with other instruments, this is my favorite way to do it. Without getting too much into the nuances of reverb, there are a few different types that have different sounds. My favorites are plate (tight, high frequencies, linear decay), hall (usually dull sounding, 3D, lush), and room (tight, early reflections, width).
I tend to blend a little of all three to get the vocals to sit just right.
Adding reverb will almost always make the vocals feel like they are being pushed back in the mix, but you can add a little predelay (50-100 ms) to make the vocalist feel like they are close to the listener, but still in a large room.
YMMV with different plugin companies, but some of my favorites are:
- Stock Cubase Roomworks SE (yep, that’s right!)
Pro Tip: If your delays are still too obvious, try putting a reverb plugin immediately after the delay! Be sure to send the signal straight from the delay to the reverb and adjust the reverb to “smooth out” the delay repeats.
Make vocals more 3D by using a reverb. Be careful! Using too much causes the vocals to feel farther away from the listener and the lyrics can get hard to understand.
EQ Your Aux Bus or FX Sends!
Don’t be afraid to take an EQ to your aux bus/FX sends! Often times, there will be a large buildup of frequencies from sending multiple tracks to these effects.
A lot of clarity can be added when mixing singing vocals by simply removing some of these frequencies.
EQing Other Elements To Make Vocals Fit In a Mix
If there is one thing that you should take away from this article, it’s this!
Sometimes vocals won’t sound clear in a mix and it has nothing to do with how the vocals are mixed! It’s the arrangement of the other elements. Sometimes there just isn’t room for the vocals.
So how do we know what the problem instruments are?
Just take an EQ to the track you might think is masking the vocals. Make a large boost of about 10-15 dB and sweep back and forth. Now, Do NOT listen to the instrument when sweeping frequencies, rather listen to the VOCAL.
This is so important.
You are looking for the spot where the vocals are the hardest to hear. When you find that spot, STOP. That is where you will cut frequencies out of the instrument.
This punches a hole for the vocals to sit! Without doing anything to the vocals, you will quickly find that the vocals sound so much clearer!
Many More Tips and Tricks
If you want to learn even more about automating vocals to add impact, what vocal throws are and how to set them up, and many other tricks, just watch the full video below!
Watch The Video
Ultimate Guide to Mixing Clean Vocals for Metal and Rock
Like this video?
👇👇👇
PLUGINS USED
🔗 Waves CLA76: bit.ly/2uEzk1a
🔗 Waves C6 Multiband Compressor: bit.ly/31M26Jr
🔗 Waves H-Delay: bit.ly/3hPm0dW
🔗 Waves L1 Limiter: bit.ly/2SBr4qN
🔗 Waves SSL Comp: bit.ly/2T5HHeu
🔗 Waves Puigtec EQ: bit.ly/2UOSLPt
🔗 SoundToys DevilLok: bit.ly/3emeOUy
🔗 SoundToys Microshift:
🔗 SoundToys: Little Plate: bit.ly/2V1cwT6
🔗 Lexicon PCM90 Reverb: bit.ly/3eg25To
🔗 Oeksound Soothe 2: bit.ly/2U7wqus
GEAR USED
Slate VMS ML-1 Microphone (Vocals on Song): amzn.to/3eixrsI
Canon 77d: amzn.to/2BmN6sq
Rode Microphone (Video): amzn.to/37Phmbe
Boom Stand for Mic: amzn.to/2YYjn0O
Ring Light: amzn.to/2Yj6qzB
SUPPORT THE ARTIST
💎 Artist: Heist At Five
🎶 Song: Falling With Style
🔗 Info: www.heistatfive….
🔗 Music: open.spotify.com……
🔗 FB: www.facebook.com…
🔗 IG: instagram.com/he…
🎤 Engineered, Mixed, Mastered, and Co-produced: Sean Frost at Frozen Sounds Audio
These are affiliate links which helps support this blog. Not only will you often get a discount, but I’ll get a little tip from each sale that’s equivalent to buying me a coffee for helping you out 😀
AND we will use the same plugins, so if you have any questions you can just send me a message!
FINAL THOUGHTS
I know that was a LOT of information, but I needed to put it all in one spot so you can bookmark this page and refer back when needed.
Also, if you made it this far, please share this article with others that would find it helpful! Drop a link on your social media account, or share the video!
As always, thank you so much for stopping by and learning with me. If you have any questions at all, leave them in the comments below, or head over to our contact page and send me a message! I’d love to hear your thoughts.
Best of luck with you music!
By the way…
You may also like some of these helpful video tutorials!










It’s interesting to know that you can remove the frequencies with the worst sound if you boost the EQ. I can imagine how vocalist producing services have studied and experienced a lot when it comes to the systems related to that industry in order to understand those things. Personally, I don’t even know what the EQ is, so this just shows how having a professional when you are producing songs or even podcasts will help in creating quality pieces.