[Recording Hack] How to Record Vocals Without Headphones
![[Recording Hack] How to Record Vocals Without Headphones](/blog/s/img/wp-content/uploads/2018/09/Record-without-Headphones-1100x640.jpg)
Capture the best vocal performances in the studio: A step-by-step guide to recording vocals without headphones!
Recording vocals in a studio is a much different experience than performing live. Many vocalists aren’t used to wearing headphones and hearing their own, dry voice fed back to them. Sometimes, this discomfort can lead to bad performance and costly studio bills because of the additional takes required to get a great performance. In the worse cases, the great performance may never happen! Why are engineers so against recording vocals without headphones? The answer is simple – they believe the bleed from the speaks will ruin the vocal recording. This just isn’t true!
This article provides a step-by-step guide on different ways to record vocals for your project without having to resort to headphones.
What this Tutorial covers:
- Maximizing microphone bleed rejection based on polarity patterns (cardioid, figure 8, omni, etc.)
- EQ tricks to minimize audible bleed
- Simple sound absorption tricks that can be used in any studio
- How to correctly record a “bleed track”
- Phase cancellation of bleed from vocal tracks
THe setup
The basic strategy is to cancel out any bleed getting into the microphone during vocal recording.
- STEP 1: Find the lowest volume of the song where the vocalist can still “get into” the performance.
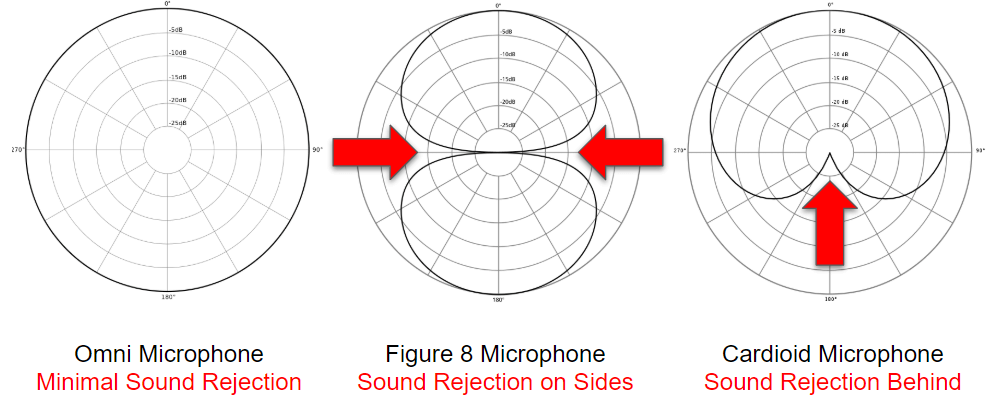
- STEP 2: Place the vocal mic so the null is facing the studio monitors that are playing music for the vocalist.
- If using a cardioid or hypercardioid microphone, place the back of the microphone towards the speaker.
- If using a figure 8 microphone, place the side of the microphone to the speaker
- Do NOT use an omni microphone for this as you will not be able to reject any bleed with this polarity pattern.

The dark black line shows the direction that sound is easily recorded with a microphone. The closer the dark line is to the center of the circle, the more the sound is rejected. The red arrows indicate the “blind spots” on the microphone and are the spots that reject sound the most.
- STEP 3: Once the volume is at a good level and the microphone has been placed, DO NOT MOVE OR CHANGE THE ANYTHING (volume, EQ, etc.). If you need to, tape stuff down to keep it from moving!
- STEP 4: Record the vocal takes including the bleed from the speakers.
- STEP 5: While the vocalist is still in front of the microphone, record only the bleed from the song. In other words, have the vocalist stand in front of the microphone without singing or rapping and record only the sound of the music playing back. This track will be used to cancel out the bleed from the microphone.
- STEP 6: Now phase invert the bleed track you recorded from STEP 5. This will cancel out a lot of the bleed that was recorded during the vocal tracking.
On the recorded bleed track, flip the phase to cancel out most of the bleed from the main vocal track.
- STEP 7: Mix down or consolidate the vocal track and phase inverted bleed track into a single file before editing or mixing. This will ensure the bleed track will properly phase cancel with the vocal track.
That’s it – you now have a relatively quiet vocal track with minimal bleed. While it’s not perfect, it works pretty well. More often than not, the slight bleed that remains can easily be hidden in the mix.
Tips that may help minimize the bleed even more:
- Hang a heavy blanket or towel either on the wall or from a mic stand (set the microphone stand into a “T” position) in front of the speaker but behind the vocalist. This helps to absorb the more problematic high frequency bleed.
- Make a mono mix of the song for the vocalist and play it from only one speaker instead of both. You can better position the null of the microphone to this one speaker for maximum sound rejection.
- Remove some of the unnecessary low and high end frequencies with a high and low pass filter on the master bus or main output channel. Remove as much of these frequencies as possible, but don’t make the song difficult for the vocalist to connect to. Remember, the performance should be #1. A good starting point is a high pass filter set to 150 Hz and a low pass filter around 8 kHz. Feel free to adjust as needed.
- Keep the bleed tracks only as long as the vocal track. Be sure to remove the recorded bleed tracks if there aren’t any vocals in a section. Leaving them in will only ADD bleed to the recording.
Once you complete a vocal take, combine it with the inverted noise track to make a single, noise canceled audio track. Do this right away to keep your sessions clean and organized. Make sure the faders are set to the exact same level before combining. This gives the best noise reduction.
Have you ever tried recording vocals without headphones? How did it sound? Let us know below!


![[Start to Finish] How to Mix Pop/Reggae with Female Vocals Step-By-Step](/blog/s/img/wp-content/uploads/2019/11/Start-To-Finish-440x264.png)

![How To Master Metal In a Home Studio Using Plugins [Start To Finish]](/blog/s/img/wp-content/uploads/2021/02/mastering-metal-thumbnail-440x264.jpg)


