8 Tips to Get the Most from Online Song Mastering

PREPARING YOUR SONGS FOR ONLINE SONG MASTERING
Mastering is the final step to releasing your music after all your hard work in the studio, so it is very important you set up your mastering engineer for success. I’ve put together a list of the many common mistakes I’ve seen over the years that can easily be avoided. This article covers the top 8 most important rules to follow to get your mix exported correctly so you can get the most from your mastering engineer. To learn more about mastering, check out our article on what audio mastering is.
Before I get into the potential pitfalls and common mistakes made by mixing engineers, I must warn you that mastering brings out all the details of the recording – both good and bad. Mastering makes good mixes sound incredible, but bad mixes may not benefit from mastering at all. Don’t expect miracles from mastering.
1. REMOVE ANY DYNAMICS PROCESSING ON THE MAIN OUTPUT BUS
The mastering engineer must have flexibility when it comes to controlling the movement and dynamics of the song. Removing all dynamic processing from the main output bus gives the mastering engineer more room to sculpt the master. Leaving compressors or limiters on reduces the dynamic range of the song. Once the dynamic range is reduced, it is very difficult, if not impossible, to bring back. So bypass any compressors/limiters on the main stereo bus!
There is one exception to this rule. If the compression, EQ, or effect is absolutely necessary part of the sound, then leave it enabled on the master bus. In all other cases, let the mastering engineer sonically balance and decide how loud to make the song.
2. Bypass all dithering
Dithering is complicated. In short, dithering introduces noise to the audio signal to reduce more noticeable audio artifacts and ringing. Dithering USUALLY isn’t necessary as long as you export the audio files in the same format that they were recorded. I would recommend reading the manual of the plugin and see what the manufacturer recommends for your situation. But a good rule of thumb is to save the dithering for the mastering engineer.
(1) Disable the any main stereo output bus plugins when submitting your songs for online mastering. The mastering engineer will have the most flexibility when removed. (2) Remove any limiting and/or dithering from the stereo output bus as well. Dithering can sometimes be included on plugins, such as the Waves L2 plugin (see below). Bypass these dithering options in the plugins as well! The mastering engineer will correctly dither the audio for the playback medium, which will result in a cleaner sounding track.
3. MAKE SURE THE OUTPUT VOLUME DOES NOT EXCEED 0 DBFS (IT SHOULD NEVER BE IN THE RED).
Audible clicks and pops are usually caused from bad editing – particularly where the audio clips were not properly crossfaded. Listening to the individual tracks (especially vocals) in solo makes it easier to hear the bad edits. If you hear a click or pop, first start looking for a bad crossfade. If there are no edits and a pop or click is still audible, try editing it out that section by copying and pasting an identical section over it (and crossfade these clips!). If that isn’t possible, try re-recording that part. As a last resort, a mastering engineer should be equipped with tools to try and to repair the audio, but don’t count on it!
4. Listen for pops and clicks and edit them out!
Audible clicks and pops are usually caused from bad editing – particularly where the audio clips were not properly crossfaded. Listening to the individual tracks (especially vocals) in solo makes it easier to hear the bad edits. If you hear a click or pop, first start looking for a bad crossfade. If there are no edits and a pop or click is still audible, try editing it out that section by copying and pasting an identical section over it (and crossfade these clips!). If that isn’t possible, try re-recording that part. As a last resort, a mastering engineer should be equipped with tools to try and to repair the audio, but don’t count on it!
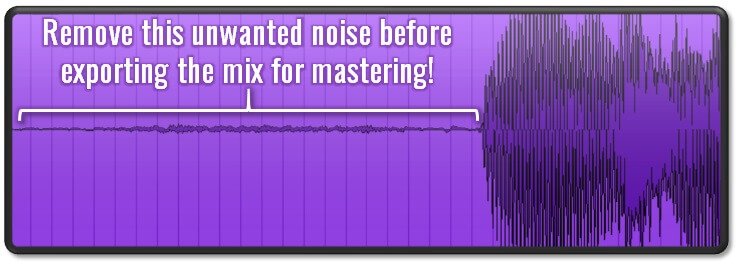
5. Remove unwanted noise (talking, headphone bleed in between vocal parts, floor creaking, unwanted count ins, etc.).
An online mastering engineer doesn’t know if a buzzing guitar or a 4-count on the high hats before the song is supposed to stay in or not. It is safe to say, if you don’t want something in the song, remove it before sending it out for mastering. When recording songs with many tracks, these unwanted noises can build up and become audible – especially after mastering. Do the mastering engineer a favor and clean up any noise or unwanted sounds from all the songs first.
6. Label your songs correctly and neatly!
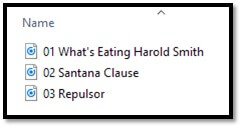
Naming your songs seems trivial, but when your online mastering engineer has 2 or 3 projects daily, this trick can really be helpful! Name the songs starting with the 2 digit track order like 01, 02, etc. This will keep the songs in the correct order for your mastering engineer. Also, make sure label the file names correctly with the full song title. More often than not, song titles change once they are completely finished, so don’t forget to update the file title as well! If the audio file isn’t properly labeled with the final song title, the mastering engineer will spend a lot of time figuring out what the actual song order and titles are, costing you time and money in the end!

A good example of proper file naming for a 3-song E.P.
7. Include a track INFO sheet with any meta data you want encoded in your mp3s or DDP
Staying organized is crucial during mastering. The song and artist information will be encoded into the files and once they are sent out, corrections are often impossible and costly! Include a track info sheet when you submit your files to the mastering engineer. The info sheet should have all the information about the song titles and meta data in one convenient document – making it very easy for the mastering engineer to properly encode the final masters. We’ve created an editable info sheet that you can download and use the next time you submit your files for mastering. Your mastering engineer will thank you.
8. Export the mix in an uncompressed audio format (WAV, AIFF, etc.).
The last mistake I see is sending compressed (lossy) audio formats for mastering. These file formats include MP3, M4A, WMA, etc. Send only uncompressed file formats such as WAV, AIF, OGG, or FLAC. Additionally, the songs should be recorded and exported at 24-BIT (or 32-BIT). MP3s should only be submitted as a last resort!
Compressed audio formats are what you typically purchase from major online music sellers (iTunes) because of their smaller file size. The reduction in file size occurs because the audio quality is reduced. Often, the data removed from the audio files to reduce the file size are the frequencies that are hardest to hear. The more compressed the audio, the greater the amount of distortion and artifacts. If possible, never send a mastering engineer compressed/lossy audio files like MP3s, M4As, and WMA. Only send uncompressed audio formats such as WAV, AIF, OGG, or FLAC. These files retain all the audio information.
Pro Tip: Scroll to the bottom to watch the video at the end of the article where Bobby walks you through each step of the process!
Closing Thoughts
To quickly summarize, don’t paint your mastering engineer in a corner by reducing dynamics or adding EQ/effects on the main output bus. Make sure to export your files in the highest quality that they were recorded at (up-converting doesn’t help!). Lastly, name your song files well with their track number and final track titles. If possible, supply your mastering engineer with a track info sheet with all the album meta data on it for encoding.
How have you been submitting your songs for mastering? Tell us below in the comments below!


